

 sheilascorner Home
 Websites
General Violin & Bow CARE
|
 violins & bows
 A
A  R
R  Some thoughts from friends to help you maintain your violin and bow.
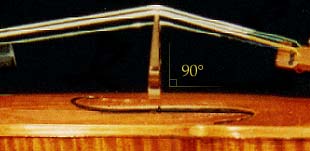 It is a common problem and one that
can be a nuisance for players if it is left wholly unattended or
infrequently attended, for in the worst case the tightening of strings
may eventually pull the top of the bridge so far north that the bridge
becomes warped, or, worse still, falls over.
It is a common problem and one that
can be a nuisance for players if it is left wholly unattended or
infrequently attended, for in the worst case the tightening of strings
may eventually pull the top of the bridge so far north that the bridge
becomes warped, or, worse still, falls over.

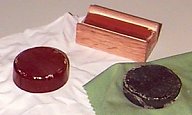 Keeping a round cake of rosin in usable shape takes some thought when you are rosining the bow.
Keep turning the cake each time you use it, to maintain a flat surface on the rosin cake. A flat surface will make better contact
with the bowhair and also will not harm the wood of the bow. In this picture you can see on the left a round cake of light rosin (Obligato by Pirastro) that is fairly new, on the right a cake of dark rosin (Olive by Pirastro) that is several years old, and on the top a
wooden holder type (Super-Sensitive) rosin. Many rental violins come with the wood holder rosin. The wood holders are a problem when the rosin gets low in the holder. The bow wood can rub on the wood holder and the hair gets hurt. I recommend the round cakes in cloth wrappers. There are also round cakes available in foam wrappers; however, after a while the foam wrappers tend to disintegrate and make a mess on the rosin. I even had one foam wrapper become stuck all over the rosin.
Keeping a round cake of rosin in usable shape takes some thought when you are rosining the bow.
Keep turning the cake each time you use it, to maintain a flat surface on the rosin cake. A flat surface will make better contact
with the bowhair and also will not harm the wood of the bow. In this picture you can see on the left a round cake of light rosin (Obligato by Pirastro) that is fairly new, on the right a cake of dark rosin (Olive by Pirastro) that is several years old, and on the top a
wooden holder type (Super-Sensitive) rosin. Many rental violins come with the wood holder rosin. The wood holders are a problem when the rosin gets low in the holder. The bow wood can rub on the wood holder and the hair gets hurt. I recommend the round cakes in cloth wrappers. There are also round cakes available in foam wrappers; however, after a while the foam wrappers tend to disintegrate and make a mess on the rosin. I even had one foam wrapper become stuck all over the rosin.
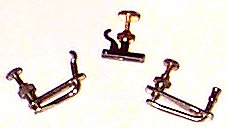 There are three types of tuners pictured here. The top one is a Durhill midget-style. The other two are lever style. The advantage to the midget style is that the lower part slides back and forth rather than up and down toward the violin top. Damage can be done by the lever style if they are allowed to touch the top of the violin. Many
fractional size violins come with the lever type of tuner. This is because the small violins are hard to tune with the pegs. However, the lever tuners also dampen the sound and many times end up pressing on the top of the violin. Keep and eye on the lever tuners to be sure you do not damage the top of your violin. The midget tuners need to be watched for burrs or sharp places on them so they do not cut the loop of the string. If your string is breaking at the tuner be sure to check for sharp edges on the tuner. These can be ground smooth.
There are three types of tuners pictured here. The top one is a Durhill midget-style. The other two are lever style. The advantage to the midget style is that the lower part slides back and forth rather than up and down toward the violin top. Damage can be done by the lever style if they are allowed to touch the top of the violin. Many
fractional size violins come with the lever type of tuner. This is because the small violins are hard to tune with the pegs. However, the lever tuners also dampen the sound and many times end up pressing on the top of the violin. Keep and eye on the lever tuners to be sure you do not damage the top of your violin. The midget tuners need to be watched for burrs or sharp places on them so they do not cut the loop of the string. If your string is breaking at the tuner be sure to check for sharp edges on the tuner. These can be ground smooth.
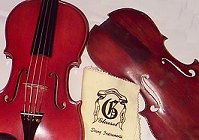 The violin on the left is a clean violin. It has been wiped down after each playing period with a soft cloth. The violin top on the right shows the rosin accumulation under the fingerboard area. The flannel cloth shown is just an
example of cloths available from different sources to keep in a case for wiping down a violin. This one is an untreated soft flannel. Silk or soft cotton would be good also.---Sheila
The violin on the left is a clean violin. It has been wiped down after each playing period with a soft cloth. The violin top on the right shows the rosin accumulation under the fingerboard area. The flannel cloth shown is just an
example of cloths available from different sources to keep in a case for wiping down a violin. This one is an untreated soft flannel. Silk or soft cotton would be good also.---Sheila
 |
~ website and graphics © Sheila K. Helser ~
graphics not available for download or use in a collection return to sheilascorner.com |
General Violin & Bow CARE
|
|
~ website and graphics © Sheila K. Helser ~
graphics not available for download or use in a collection return to sheilascorner.com |